Eggnog Macarons with Cinnamon & Nutmeg.
New Macaron Flavor So delicious! And, perfect for holiday hosting or cookie exchanges.
For additional pictures and flavors, please see my earlier recipes:
Other recipes and pictures:
Lavender Vanilla Macaron Recipe
Chocolate Raspberry Skyr Macaron Recipe
Orange Blossom Macaron Recipe
Rose Vanilla Elderflower Macaron Recipe
Eggnog with Cinnamon & Nutmeg Macaron Recipe
Vanilla-Ginger Macaron Recipe
Snickerdoodle Macaron Recipe
Lavender Vanilla Macaron Recipe
Chocolate Raspberry Skyr Macaron Recipe
Orange Blossom Macaron Recipe
Rose Vanilla Elderflower Macaron Recipe
Eggnog with Cinnamon & Nutmeg Macaron Recipe
Vanilla-Ginger Macaron Recipe
Snickerdoodle Macaron Recipe
Eggnog Macarons
Dry ingredients.
In one bowl mix:
90g powdered sugar
1/4 tsp cinnamon (I used one from Penzeys)
1/8 tsp nutmeg
Pinch salt
Pinch salt
Sift the dry ingredients through a sieve, or aerate with food processor to remove clumps.
In a separate medium-sized bowl make the meringue mixture.
You’ll need:
2 egg whites
1/2 tsp vanilla
1/4 tsp white vinegar
1/4 c granulated sugar
Additional ingredients for the Eggnog Buttercream are listed below
Add the vinegar and vanilla to the egg whites. Whip until frothy. Slowly add sugar, one tsp at a time, while continuing to beat egg whites until stiff peaks are formed about 3-5 minutes.
When meringue mixture is done, sprinkle 1/2 of dry mix over the meringue and gentle fold the dry mix into the meringue using a rubber spatula. Be careful not to deflate the meringue. Sprinkle other half of dry mix onto the meringue. Continue to fold the dry mix into the meringue mixture being careful not to deflate the meringue.
The macaron mixture is done when the batter is thick and “lava like”. It should fall off the rubber spatula in a thick ribbon and begin to self-level after about 20 seconds. If the batter “ribbon” is still thick or bumpy, fold the batter a few more times. Do NOT over mix. It is better to undermix than overmix the batter.
The macaron mixture is done when the batter is thick and “lava like”. It should fall off the rubber spatula in a thick ribbon and begin to self-level after about 20 seconds. If the batter “ribbon” is still thick or bumpy, fold the batter a few more times. Do NOT over mix. It is better to undermix than overmix the batter.
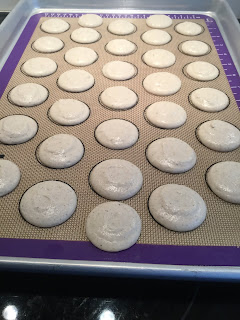
Pipe the macarons onto a silicone macaron template, or onto a parchment lined cookie sheet. About 1.25” rounds work well. Place them about an inch apart to allow them to expand. Tap the tray onto the countertop or tap the bottom of the tray with your hand to remove air bubbles.
Let sit for at least 20 minutes until the shells are dry to the touch. You may need to set in oven or put a fan on in the kitchen during the resting period to avoid the effects of humidity. (Don’t rush this step. It can take up to 40 minutes for the macarons to dry out .... depending on the weather or texture of your batter.)
The cookie shells are ready to bake when you can touch the cookie and no batter sticks to your finger. If you do not allow proper resting time, your cookies will not rise and create the “feet” that are such an identifiable feature of a macaron. While the cookies are resting, preheat the oven to 315 degrees.
The cookie shells are ready to bake when you can touch the cookie and no batter sticks to your finger. If you do not allow proper resting time, your cookies will not rise and create the “feet” that are such an identifiable feature of a macaron. While the cookies are resting, preheat the oven to 315 degrees.
During the resting period, begin the filling:
Eggnog buttercream filling.
You’ll need:
4tbsp softened butter
1/4 c powdered sugar
1.5 tbsp rich eggnog (I used eggnog from Homestead Creamery ( at Whole Foods))
Whip butter until creamy. Add powdered sugar and mix until smooth. Finally add the eggnog and mix until a light and fluffy filling is created. Spoon into a piping bag with a round tip and set in the fridge to chill slightly.
When the macarons are dry to the touch, bake one tray at a time for 13-14 minutes in a 315 degree preheated oven.
The cookies are done if they lift easily off the mat or parchment when cooled. If they are still moist or sticky, bake a couple more minutes or let them sit in the warm oven for a few additional minutes.
The cookies are done if they lift easily off the mat or parchment when cooled. If they are still moist or sticky, bake a couple more minutes or let them sit in the warm oven for a few additional minutes.
Remove the filling from the fridge to soften slightly while the shells cool. Let the macaron shells cool completely before adding the filling. Pair the macaron shells by matching sizes. Pipe a small amount of filling on one shell. Gently twist the top shell onto the bottom shell to evenly distribute the filling around the shell. Dust lightly with cinnamon.
Place the macarons into an airtight container and place in the refrigerator. Allow the cookies to refrigerate at least 24 hrs for the flavors and textures to meld together. When ready to serve, remove from fridge and let the cookies reach room temperature before enjoying!
 |
| Sifting the dry ingredients and pressing out the clumps |
 |
| Frothing the egg whites for the meringue |
 |
| Folding the dry ingredients into the meringue. |
 |
| Waiting for outer shell to be created |
 |
| Matching shells by size |
 |
| Crispy on the outside, chewy on the inside. Yum! |
Materials Used:
These are the actual items that I used. You can use parchment paper in place of the silicone mats and you can use a plastic ziplock type bag in place of the pastry bag.
I participate in the Amazon Services Associates Program, an affiliate advertising program designed to provide a means for me to earn fees by linking to Online Shopping for Electronics, Apparel, Computers, Books & more, and affiliated sites.
I purchased the above items at full-price. I did not receive a discount or a promotional credit in exchange for my post. I'm simply linking to the items that I actually bought and used in this recipe in case others might be interested.
I purchased the above items at full-price. I did not receive a discount or a promotional credit in exchange for my post. I'm simply linking to the items that I actually bought and used in this recipe in case others might be interested.


Comments
Post a Comment